How To Catch a Roof Leak Early
- On July 18, 2025
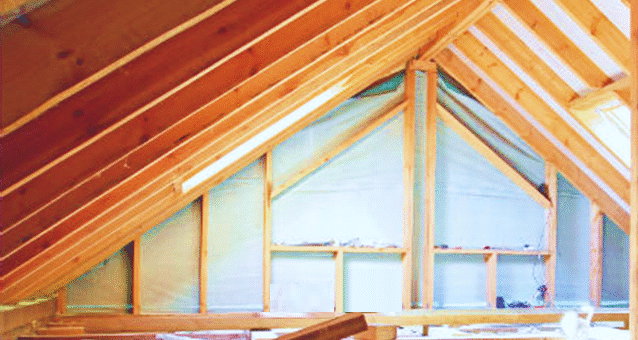
How To Catch Roof Leaks Early From Inside Your Attic
Many homeowners in Haymarket, VA, may be unaware that a roof leak is quietly causing damage in their home. Often, leaks go unnoticed until water stains appear on ceilings or walls, signaling that the problem has already progressed significantly. By this point, the damage can be extensive, affecting the wood, insulation, drywall, and even fostering mold and mildew growth. These issues can lead to costly repairs and potential health hazards. The good news? You can catch roof leaks early by performing a simple quarterly inspection in your attic, saving you time, money, and stress.
At M&M Roofing and Exteriors, we believe proactive maintenance is key to protecting your home. Inspecting the underside of your roof from inside your attic at least once every three months can help you identify early signs of leaks before they escalate into major problems. Below, we outline the steps for conducting a thorough attic inspection and highlight what to look for to catch roof leaks early.
Why Inspect Your Attic Regularly?
Roof leaks often start small, with water seeping through tiny gaps or damaged areas in your roofing materials. These leaks can go undetected for months, allowing water to saturate wooden beams, insulation, and drywall in your attic. Over time, this moisture can weaken structural components, ruin insulation, and create an environment where mold and mildew thrive. By the time you notice water stains or dripping inside your home, the damage may already require extensive repairs.
A quarterly attic inspection takes just a short amount of time but can help you spot issues early, allowing you to call for professional repairs before the problem worsens. This proactive approach can save you from costly damage and keep your home safe and dry.
Steps for Inspecting Your Attic for Roof Leaks
Follow these steps to perform a thorough inspection of your attic and catch potential roof leaks early:
1. Prepare for Safety
-
Wear protective gear: Use gloves, a dust mask, and sturdy shoes to protect yourself from dust, insulation fibers, or sharp objects.
-
Bring a bright flashlight: Attics are often dimly lit, so a strong flashlight is essential to see details clearly.
-
Ensure safe access: Use a stable ladder to access your attic and watch your step to avoid tripping or stepping through the ceiling.
-
Check during or after rain: If possible, inspect your attic during or shortly after rainfall, as leaks are more likely to be visible when active.
2. Examine the Underside of the Roof
-
Use your flashlight to inspect the roof decking (the wooden surface under the roofing materials) for signs of water intrusion.
-
Look for dark spots, stains, or discoloration on the wood, as these often indicate water exposure.
-
Check for damp or wet areas, which may feel soft or spongy to the touch.
-
Pay attention to any mold or mildew growth, which appears as fuzzy or powdery patches and indicates prolonged moisture exposure.
3. Inspect Key Areas Prone to Leaks
Some areas of your roof are more susceptible to leaks due to their design or exposure to the elements. Focus on these common trouble spots:
-
Around roof penetrations: Check areas where chimneys, vents, skylights, or plumbing pipes pass through the roof. Improperly sealed flashing around these penetrations is a common source of leaks.
-
Valleys: Roof valleys, where two roof slopes meet, channel water and are prone to leaks if shingles or flashing are damaged.
-
Near dormers or roof edges: These areas are often exposed to heavy water flow and may develop leaks if seals or shingles are compromised.
-
Nail holes or fasteners: Look for rust or corrosion around nails or other fasteners, as these can allow water to seep through.
4. Check Insulation and Other Materials
-
Inspect insulation for signs of water saturation, such as clumping or darkening. Wet insulation loses its effectiveness and can promote mold growth.
-
Look for water stains or damage on rafters, beams, or drywall in the attic, as these can indicate a leak that’s already spreading.
5. Smell for Musty Odors
-
A musty or moldy smell in the attic is a red flag for moisture issues. If you detect this odor, investigate further to locate the source of the leak.
6. Document and Monitor Any Issues
-
If you spot potential signs of a leak, take photos and note the location for reference.
-
Mark areas of concern with chalk or tape and check them again during your next inspection to see if the issue has worsened.
-
If you find any signs of water damage or suspect a leak, contact a professional roofing contractor promptly to assess and repair the problem.
What to Look For
When inspecting your attic, keep an eye out for these specific signs of roof leaks:
-
Water stains or discoloration on the roof decking, rafters, or beams.
-
Damp or wet spots on wood or insulation.
-
Mold or mildew growth, which may appear as black, green, or white patches.
-
Rust or corrosion on nails, flashing, or metal components.
-
Peeling or bubbling paint on attic walls or surfaces.
-
Musty odors that suggest hidden moisture.
Call the Experts at M&M Roofing and Exteriors
If you’re not comfortable inspecting your attic yourself, lack the time, or simply want peace of mind, the roofing professionals at M&M Roofing and Exteriors are here to help. Based in Haymarket, VA, we offer comprehensive roof inspections, both inside and out, to identify and address potential issues before they become costly repairs. Our experienced team uses advanced techniques to detect leaks and ensure your roof is in top condition, protecting your home for years to come.
Don’t wait for a small leak to turn into a big problem. Contact M&M Roofing and Exteriors today to schedule a professional roof inspection or to learn more about our roofing services. Let us help you keep your home safe, dry, and worry-free!
0 Comments